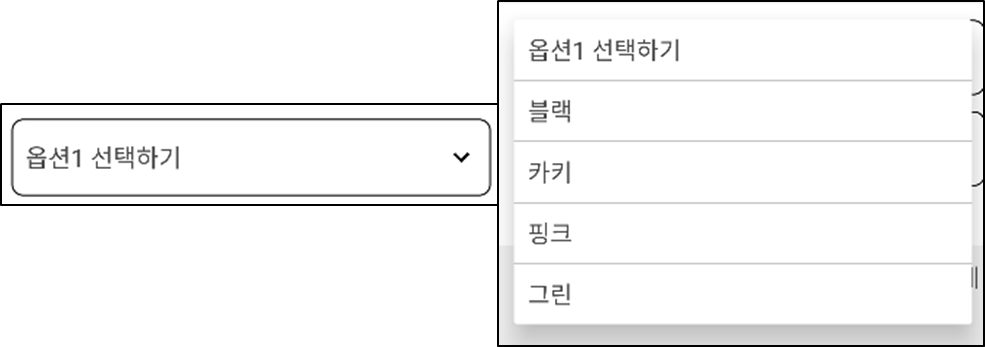
어떤 뷰를 터치했을 때 해당하는 메뉴 항목들을 사용자가 선택할 수 있도록 목록으로 펼쳐지는 방식을 드롭다운 메뉴라고 합니다.
드롭다운 메뉴는 안드로이드에서는 스피너(Spinner)를 이용해 구현할 수 있는데 이번 포스팅에서는 스피너를 구현하는 방법과 스피너를 좀 더 보기 좋게 커스텀하는 방법에 대해 알아보겠습니다.

먼저 메뉴의 목록이 될 레이아웃을 설정합니다.
item_spinner_buy_option.xml
<?xml version="1.0" encoding="utf-8"?>
<androidx.constraintlayout.widget.ConstraintLayout xmlns:android="http://schemas.android.com/apk/res/android"
    xmlns:app="http://schemas.android.com/apk/res-auto"
    xmlns:tools="http://schemas.android.com/tools"
    android:layout_width="match_parent"
    android:layout_height="wrap_content"
    android:padding="10dp">

    <TextView
        android:id="@+id/tv_spinner"
        android:layout_width="wrap_content"
        android:layout_height="wrap_content"
        android:text="TextView"
        android:textColor="@color/main_text"
        android:textSize="18sp"
        app:layout_constraintStart_toStartOf="parent"
        app:layout_constraintTop_toTopOf="parent" />

</androidx.constraintlayout.widget.ConstraintLayout>
저는 padding과 텍스트 속성만 변경했지만 자유롭게 뷰를 추가해도 무방합니다.
background_spinner_option.xml ( :drawable)
<?xml version="1.0" encoding="utf-8"?>
<selector xmlns:android="http://schemas.android.com/apk/res/android">
    <item>
        <layer-list>
            <item>
                <shape android:shape="rectangle">
                    <solid android:color="@color/white"/>
                    <stroke android:color="@color/black" android:width="1dp"/>
                    <padding
                        android:top="6dp"
                        android:bottom="6dp"
                        android:right="10dp"/>
                    <corners android:radius="8dp" />
                </shape>
            </item>

            <item
                android:drawable="@drawable/ic_down"
                android:gravity="center|end"
                android:width="24dp"
                android:height="24dp" />
        </layer-list>
    </item>
</selector>
드롭다운 메뉴를 열기 전 보여지는 스피너 항목을 커스텀합니다.
해당 파일은 스피너의 background 속성과 연결되기 때문에 drawable 폴더에 위치합니다.
OptionSpinnerAdapter
class OptionSpinnerAdapter(context: Context, @LayoutRes private val resId: Int, private val menuList: List<String>)
    : ArrayAdapter<String>(context, resId, menuList) {

    // 드롭다운하지 않은 상태의 Spinner 항목의 뷰
    override fun getView(position: Int, converView: View?, parent: ViewGroup): View {
        val binding = ItemSpinnerBuyOptionBinding.inflate(LayoutInflater.from(parent.context), parent, false)
        binding.tvSpinner.text = menuList[position]

        return binding.root
    }

    // 드롭다운된 항목들 리스트의 뷰
    override fun getDropDownView(position: Int, convertView: View?, parent: ViewGroup): View {
        val binding = ItemSpinnerBuyOptionBinding.inflate(LayoutInflater.from(parent.context), parent, false)
        binding.tvSpinner.text = menuList[position]

        return binding.root
    }

    override fun getCount() = menuList.size
}
메뉴 항목과 Spinner를 연결할 Adapter를 생성합니다. 메뉴가 될 데이터를 배열로 관리하기 위해 ArrayAdapter를 상속받습니다.
저는 드롭다운 메뉴 터치 시 선택한 메뉴가 Spinner에 표시되도록 해당 position의 배열 값을 뷰에 할당해 주었습니다.
@LayoutRes는 레이아웃 리소스인데 드롭다운 메뉴의 xml 파일을 전달받습니다.
BuyFragment
class BuyFragment : Fragment() {
    private var _binding : FragmentBuyBinding? = null
    private val binding get() = _binding!!

    override fun onCreateView(inflater: LayoutInflater, container: ViewGroup?, savedInstanceState: Bundle?): View? {
        _binding = FragmentBuyBinding.inflate(inflater, container,false)
        return binding.root
    }

    override fun onViewCreated(view: View, savedInstanceState: Bundle?) {
        super.onViewCreated(view, savedInstanceState)

        val list = listOf("옵션1 선택하기","블랙","카키","핑크","그린")

        binding.spinner.adapter = OptionSpinnerAdapter(requireContext(), R.layout.item_spinner_buy_option,list)
        binding.spinner.onItemSelectedListener = object : AdapterView.OnItemSelectedListener {
            override fun onItemSelected(p0: AdapterView<*>?, p1: View?, p2: Int, p3: Long) {
                val value = binding.spinner.getItemAtPosition(p2).toString()
                Toast.makeText(requireContext(), value, Toast.LENGTH_SHORT).show()
            }
            override fun onNothingSelected(p0: AdapterView<*>?) {
                // 선택되지 않은 경우
            }
        }
    }
}
Spinner가 있는 액티비티 혹은 프래그먼트에서 어댑터를 연결합니다.
그리고 Spinner의 onItemSelectedListener 속성을 통해 아이템이 선택되거나 선택되지 않은 경우 설정을 추가할 수 있습니다. 저는 아이템 선택 시 해당 메뉴를 토스트 메시지로 출력했습니다.
또한, Spinner 커스텀을 위해 Spinner가 있는 xml 파일에서 위에서 만들어둔 background_spinner_option.xml을 background 속성에 추가합니다.
android:theme="@style/SpinnerTheme" 속성은 드롭다운 메뉴와 메뉴 사이에 구분선을 추가하기 위해 style을 지정했습니다.
<style name="SpinnerDivideStyle" parent="android:style/Widget.ListView.DropDown">
    <item name="android:divider">@color/sub_text</item> <!-- divider 색 -->
    <item name="android:dividerHeight">1dp</item> <!-- divider 높이 -->
</style>
<style name="SpinnerTheme">
    <item name="android:dropDownListViewStyle">@style/SpinnerDivideStyle</item>
</style>
해당 style 태그는 values 폴더 안 themes.xml에 추가합니다.
실행결과

'Android' 카테고리의 다른 글
| [안드로이드] Fragment에서 뒤로가기 처리하기 - onBackPressedDispatcher (0) | 2023.02.01 |
|---|---|
| [안드로이드] Retrofit 사용 시 "Unable to create call adapter for retrofit2 xxx ..." 오류 해결방법 (1) | 2023.01.31 |
| [안드로이드] Fragment 터치 시 뒤의 화면까지 터치되는 현상 (0) | 2023.01.19 |
| [안드로이드] Bottom NavigationView 텍스트, 아이콘 색상 변경 (1) | 2023.01.18 |
| [안드로이드] RecyclerView(리사이클러 뷰) 사용방법 (0) | 2023.01.16 |


